Creating Nature's Playground: Transforming a Fallen Tree into Log Cars, Step Stones, and Balance Beams
.png) Creating Nature's Playground: Transforming a Fallen Tree into Log Cars, Step Stones, and Balance Beams
Creating Nature's Playground: Transforming a Fallen Tree into Log Cars, Step Stones, and Balance Beams
.png)
In my last post, I introduced the exciting project of transforming my backyard into a Montessori and Waldorf inspired play space on a budget. Today, I’m thrilled to share the first project in this series: turning a fallen tree into a nature's playground. This creative reuse project not only saves money but also brings a unique, natural element to our backyard.

The Inspiration
It all started last winter when a tree in our backyard broke in half. By spring, my husband had cut it down, and our then 2-year-old was already using it as an impromptu balance beam. This sparked the idea to transform the entire tree into a fun and educational play area.

The Plan
Here's how we turned this fallen tree into log cars, step stones, and balance beams:
- Log Cars
- Step Stones
- Balance Beams
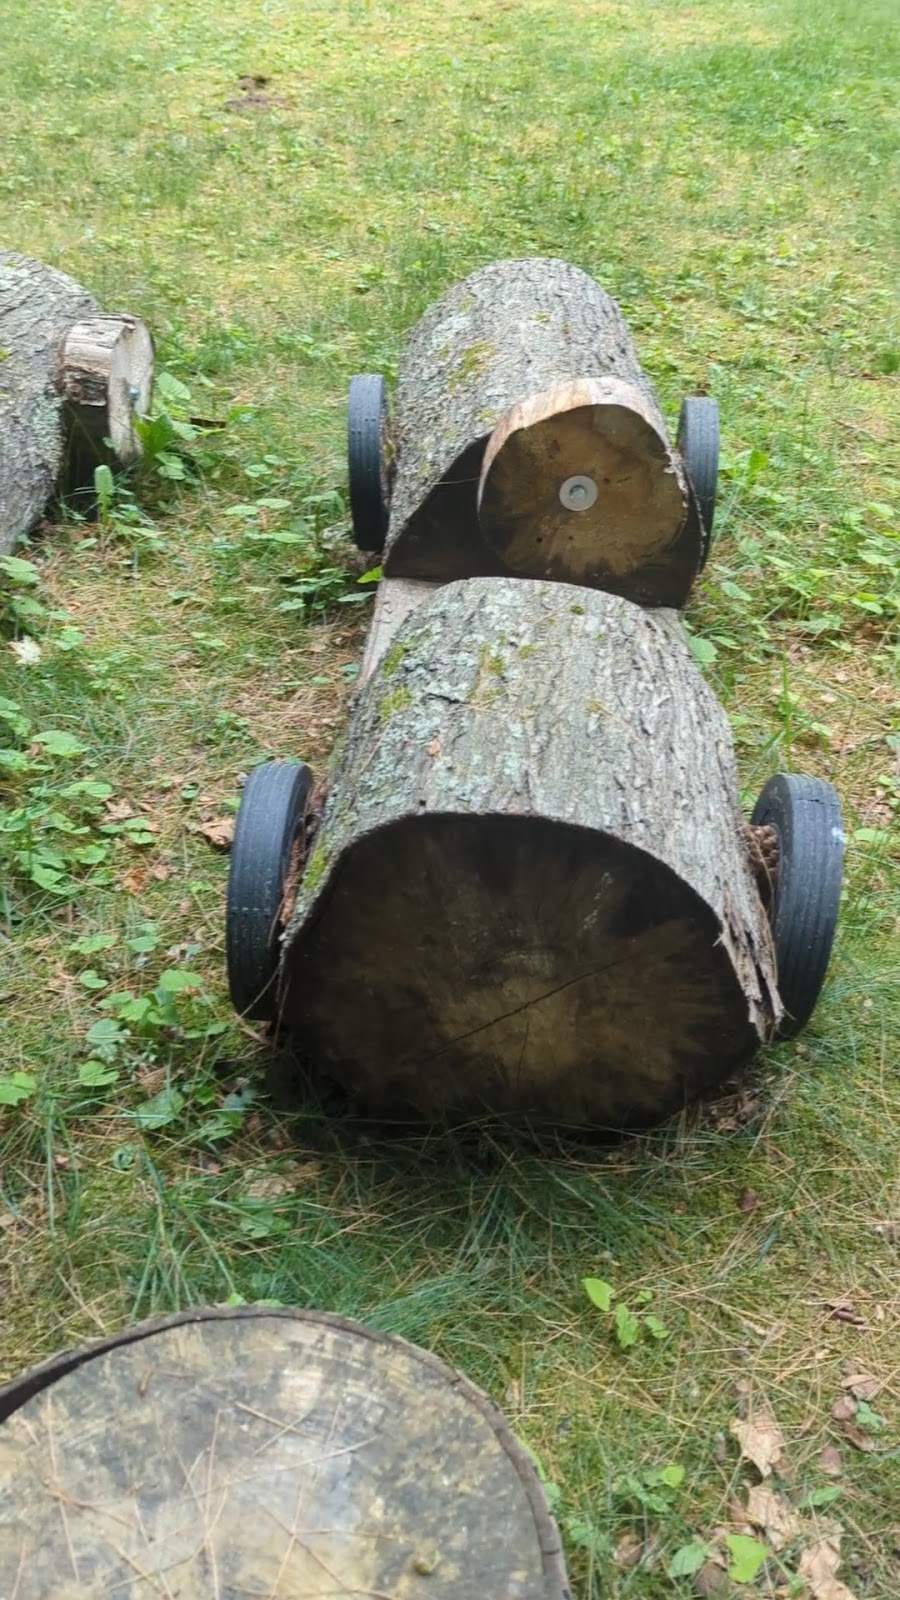
Creating the Log Cars

- Cutting the Logs: My husband cut the tree into two big logs for the car bodies and six discs for the wheels and steering wheels.
- Making the Seats: Using a chainsaw, my husband made several cuts in the logs where the seats would be. He then used a hammer and chisel to carve out the small pieces and clean up the cuts.
- Attaching the Wheels: We used wheels from a broken wagon we got for free on Facebook Marketplace for one car, and the log discs for the other. To ensure the wheels and steering wheels turned smoothly, we used about 4-5 washers between the log and the wheels, securing them with a 5/16 inch x 4in. hex lag screw and washer.
- Adding Fun Details: One of the knots in the wood looks like a gas tank, adding a whimsical touch that our kids love.


Crafting the Step Stones
Next, we created step stones from the remaining parts of the tree:
- Cutting the Discs: My husband cut the rest of the tree into various-sized discs to serve as step stones.
- Positioning the Stones: I placed the first set of step stones near the playhouse, doubling as a table and chairs. This setup allows the kids to use the stones for balancing games and also for imaginative play, pretending the stones are a picnic table and stools.
- Securing the Stones: I still need to dig holes for the step stones to make them more secure for balancing on, ensuring a safe play experience.

The step stones not only serve as functional play pieces but also enhance the natural aesthetic of the play area. Their placement near the playhouse makes for a cozy and versatile space where the kids can have tea parties, play games, or simply sit and enjoy the outdoors.

Building the Balance Beams
The limbs that broke off the tree were already perfect for balance beams:
- Choosing the Limbs: We selected limbs that were the right size and shape for balance beams.
- Positioning the Beams: The beams were placed strategically to create an engaging path for the kids to navigate. They love the challenge of balancing on the beams, and it’s a great way to develop their motor skills and coordination.

Enhancing the Play Area
To complete the nature's playground, we used the last part of the log as a natural barrier for the area behind a tree. This not only defines the play space but also adds to the rustic, natural aesthetic we’re aiming for.
 Relocating the Rock Pit
We previously had a rock pit in this area, but due to mosquitoes, sitting there to play wasn’t enjoyable. We’ll be moving the rock pit to a new location to make the play area more comfortable and fun.
Final Touches
One of my favorite features is how we positioned the log cars. With the playhouse nearby and the step stones forming a path to the balance beams, the entire setup encourages imaginative and active play. Being close makes it easy for the kids to transition from one activity to another seamlessly. They can drive their log cars up to the playhouse, hop out, and immediately start a new game with the step stones.
Join the Fun!
I’ll be documenting every step of our project, sharing tips, how-tos, and lots of photos along the way. Whether you’re looking for inspiration, practical advice, or just want to follow our journey, there’s something here for everyone.
Stay tuned for regular updates and join me on this DIY adventure! I hope this series inspires you to create your own nature-based play space, making the most of what you have and fostering a magical environment for your little ones.
Follow along on social media: https://www.instagram.com/boldlittleminds/
Visit my website: boldlittleminds.com
Tags for SEO:
#DIYBackyard #NaturePlay #MontessoriInspired #WaldorfInspired #OutdoorPlay #CreativeKids #ParentingHacks #BudgetFriendlyDIY #PlaygroundIdeas #TreeTransformation #ChildLedLearning #EducationalPlay
.png)
%20(2).png)